How To Do a Home Inventory For Insurance
15 Mar 2022 • 6 min read

For your renters insurance to work its best, it’s important to list out your home’s contents — especially the valuable stuff.
A home inventory is a small investment with a big payoff if you ever need it. It helps claims adjusters understand the value of your stuff in case of fire, theft, or other covered losses. Once you create one, you'll have extra peace of mind knowing you can fully substantiate your claim in the event of an emergency.
Ready to tackle this task? Here’s your stress-free guide to a creating a home inventory:
- Why It’s Important To Do a Home Inventory
- What To Include on a Home Inventory
- Step 1: Choose Your Inventory Method
- Step 2: Tackle Your Home Room by Room
- Step 3: Review Your Insurance Coverage
- Safe Storage for Your Home Inventory
- Final Thoughts: Guide — How To Do a Home Inventory for Insurance
Why It’s Important To Do a Home Inventory
The main reason it’s important to have a complete inventory of your home is in case you lose property in a situation covered by your insurance.
To ensure you’re getting reimbursed the correct amount, you’ll need to provide a list of everything lost — with as much detail as possible — to complete your insurance claim with your insurance company.
That can be the last task you want to do while you’re dealing with all the repercussions of an already hectic situation like a robbery or natural disaster. Plus, recording details like serial numbers and brands is nearly impossible after the fact.
Secondary to filing a claim with your insurance, having an accurate and complete home inventory helps you file losses on your tax returns so you can get the refund you deserve.
Even if you never lose any of your property, doing a complete home inventory ahead of time ensures your personal property insurance coverage is enough.
What To Include in a Home Inventory
Do you need to include everything on your home inventory? Yes! We suggest recording anything with any value.
Although each book on your shelf may only hold a few dollars of value, collectively, they account for a larger sum than you’d think. You might be surprised about how things add up, so it’s better to include as much as possible.
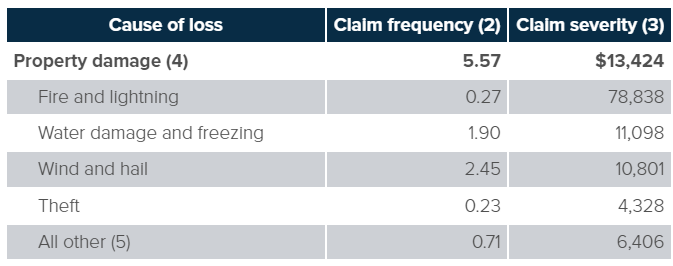
According to the Insurance Information Institute, the average insurance claim comes out to $13,424, and the most common cause of damage is wind and hail.
Step 1: Choose Your Inventory Method
Choosing how to document your belongings is the first step to your stress-free home inventory. There’s not one right way to do this, and the best method depends on how detailed you decide to be. Here are a few simple methods:
- The Quick and Easy Start: Take photos or videos of each room and upload them to the cloud. This will provide simple visual proof if you ever need to make a claim. Plus, many home inventory apps let you do this right on the app!
- The More Detailed Approach: Use a spreadsheet, app, or a good ol’ fashioned pen and paper to list items, brands, purchase dates, serial numbers, and receipts. Your worksheet offers the most accurate information for the value of the item — and since Goodcoer pays everything at replacement cost value, having as many of these details as possible ensures you get the best value when your claim pays out.
Step 2: Tackle Your Home Room by Room (or Area by Area)
Breaking your inventory down room-by-room makes this task feel way more manageable. Here’s a plan of attack:
- 1+ Bedroom Life: Section your home room by room. It’s the easiest way to make sure you don’t miss anything!
- Studio Living: If you’re in a studio, think of “areas” instead of rooms. Break it down into manageable spaces such as “home office area”, “living room”, or “closet zone”, for example.
From there:
- Pick a starting point: Smaller is better if you’re short on time or have a limited attention span. Focus on finishing completely before moving on to the next area.
- Be systematic: Work your way around the area methodically. Take note of the art on the wall, dressers and what’s inside of them, closets, under beds, and storage spaces. A top-down approach can work here, too: start with what’s highest (shelves, hanging plants), and work your way down to the rugs on your floor.
- Remember, little things count: Even in a smaller space, everyday items add up! Document your toiletries, your silverware, and every accessory in your closet if you’re up for it. The bottom line is that you should catalog everything, not just the most valuable items or recent purchases. That means things that may sound tedious to record, like small decor items or the exact number of jeans you own.
- Take special care with your most valuable items: If you’ve got irreplaceable items like an antique clock you inherited, one-of-a-kind decor, collectibles, or designer clothing, make sure to get as much detail of those items as you can.
- Take breaks: There’s no need to do everything at once. Now that you know how to do it, you can tackle one room a day, or one room a week. You’ll have your home inventory done in no time!
Detail is Key
The more information you can record about each item, the better your adjuster can accurately assess your losses if you need to go through the claims process. Ultimately, that means more money in your pocket, faster.
Here’s what to record:
- Description of the item
- Brand/serial/model number
- Cost, appraisals, or actual cash value
- Date of purchase
- Receipts
- Photos
For example, list “Dyson Supersonic hair dryer - $430 - purchased 01/2022” along with a photo, and a receipt or confirmation email if you have one. Repeat this level of detail for your shower curtain, gaming console, and everything down to what’s in your skincare fridge.
Step 3: Review Your Insurance Coverage
Now that you’ve got your inventory, it’s the perfect time to review your renters insurance policy to make sure it’s set to provide the protection you need.
- Know Your Limits: How much coverage do you have for your personal property? Does it match the value of your inventory?
- Overpaying or Underinsured?: If your inventory reveals your belongings are worth significantly less than your coverage limit, you might be able to lower your monthly premium by reducing your personal property coverage. If your items are worth more, it’s time to increase your coverage to avoid being underinsured.
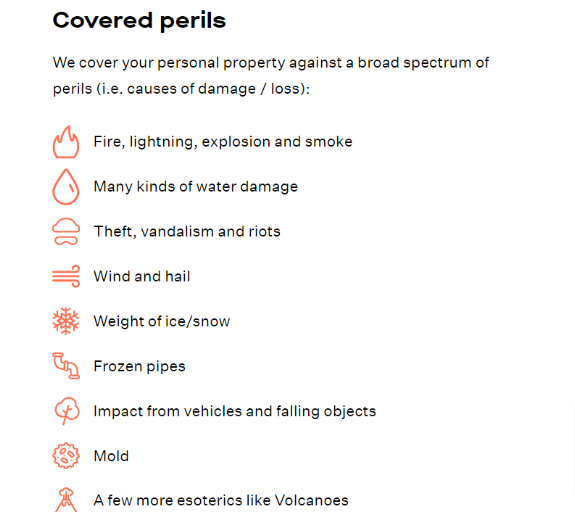
- What’s Covered (and What’s Not): Review your policy to understand the specific events your insurance protects against (fire, theft, vandalism, etc.)
- The Value of Extended Coverage: While basic renters insurance covers common risks, accidental damage isn’t covered. Goodcover’s SUPERGOOD plan offers extended coverage for your most prized possessions — jewelry, musical instruments, and cameras — so drops, spills, and other mishaps are covered with no deductible.
Get the Protection You Deserve — It’s Easy!
With Goodcover, you have the power to adjust your coverage directly from your Member Dashboard. You’ll see how changes affect your premium instantly before committing to anything. And if you need help, contact our Member Experiecne by phone, email, or chat at anytime.
Safe Storage for Your Home Inventory
For safekeeping, it’s a good idea to keep multiple copies of your home inventory. You may want to keep your home inventory in:
- Physical lists: It’s not a bad idea to keep a physical paper inventory, but if you do, store it in a place it can’t be damaged. A fireproof or waterproof safe can protect this and other important documents. Consider getting a safe deposit box to keep your records out of your home or apartment if you don’t have one.
- Digital documents: Whether a spreadsheet or a digital scan, having a copy saved to a secure location like a backup hard drive or the cloud can help preserve your digital home inventory list no matter the scenario.
- Photos and videos: Visual documentation can also be helpful to determine the condition and type of every item in your home. If you take photos and videos, make sure to upload secure copies to a drive so they don’t solely exist on your phone.
- Apps: To make the process even easier, download a home inventory app that walks you through the process and stores your information securely in their database.
Final Thoughts: Guide — How To Do a Home Inventory for Insurance
Having a home inventory for insurance is critical should you ever need to prove your losses and make sure you have enough insurance coverage.
Record every item’s description, price, and purchase date. To make it easier, work room by room and group like objects until you’re done.
Once your inventory is done, you’re ready to get insurance for your stuff! Contact Goodcover to get a quote on affordable renters insurance.
Note: This post is meant for informational purposes, insurance regulation and coverage specifics vary by location and person. Check your policy for exact coverage information.
For additional questions, reach out to us – we’re happy to help.
More stories

Dan Di Spaltro • 4 Jul 2025 • 16 min read
Renters Insurance in Sacramento: A Complete Guide

Dan Di Spaltro • 3 Jul 2025 • 12 min read
Renters Insurance in Louisiana: A Complete Guide

Dan Di Spaltro • 2 Jul 2025 • 16 min read
Affordable Renters Insurance in Sacramento, CA

Dan Di Spaltro • 1 Jul 2025 • 14 min read
Renter's Insurance Boston: A Comprehensive Guide

Dan Di Spaltro • 27 Jun 2025 • 20 min read